Eight complex Microsoft Word tricks that you probably missed.
Did you know that Word can be a powerful tool to enhance your productivity? It can help you improve your writing skills, transcribe audio recordings, and do much more. These are not just fancy features, but practical tools that can make your work easier and more efficient.
Microsoft Word
TABLE OF CONTENTS
Change the default stylesheets.
Mastering the search function.
Transcribing recorded calls.
Share documents with others and co-edit.
Access and restore previous versions of documents…
Microsoft Word is one of the world’s most popular programs, yet it is also frequently criticized. What is the most prevalent criticism? It is heavy, slow, and a prime example of “feature bloat.”
Which is correct. Word is packed with features. While some critics believe that most people use Word because everyone else does, the software is robust and capable.
Learning and using Word’s advanced features is not as daunting as it may seem. Word has certain quirks that can be frustrating, but most of the time, they’re just settings or behaviors that can be altered or avoided with another feature or proper management. With a little practice, you’ll find that these features are not only useful but also easy to use, boosting your confidence in using Word.
In this article, I’ll guide you through some of Word’s more sophisticated or unfamiliar features. By understanding and utilizing these tools, you, the reader, can feel empowered and in control of your document creation and editing. You may even discover a newfound appreciation for the program.
Disable Word’s automatic formatting
Automatic formatting is the most frustrating feature that users have encountered in Word. Word believes it knows best and does not wait for you, the user, to choose to construct a “real” list, for example.
Word Options
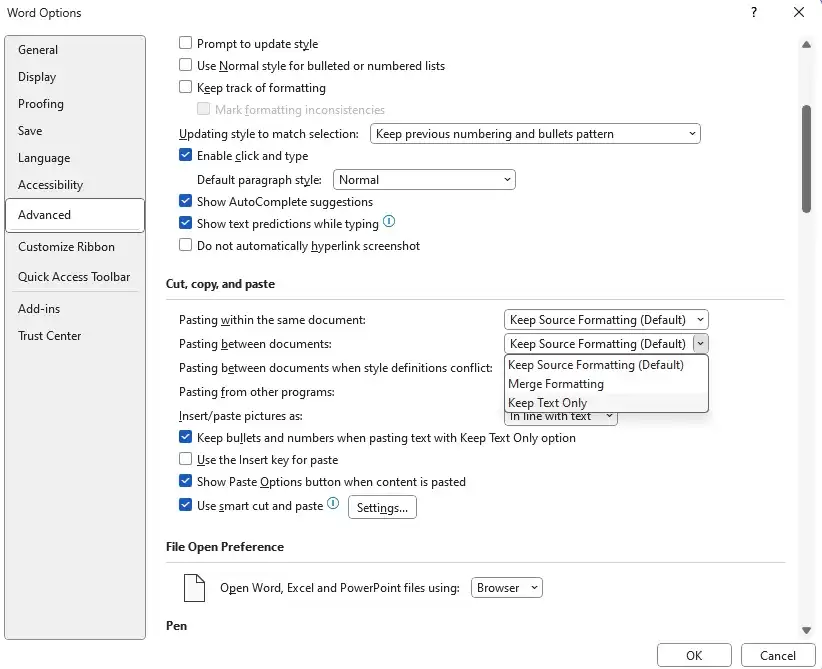
It is finally possible to modify the way Word pastes formatted text.
Word has always insisted on pasting text while retaining formatting, but an upgrade this spring offered the option to choose how you wish to do it by default. This means you can set it such that Ctrl+V only pastes text with the same formatting as the surrounding content. Merge formatting is another new option that retains the bold/italic/underline/overline and list styles while matching the target font, color, and size. This lets you copy a structured list from a Helvetica document to Aptos, Word’s standard typeface.
Word Autoformat
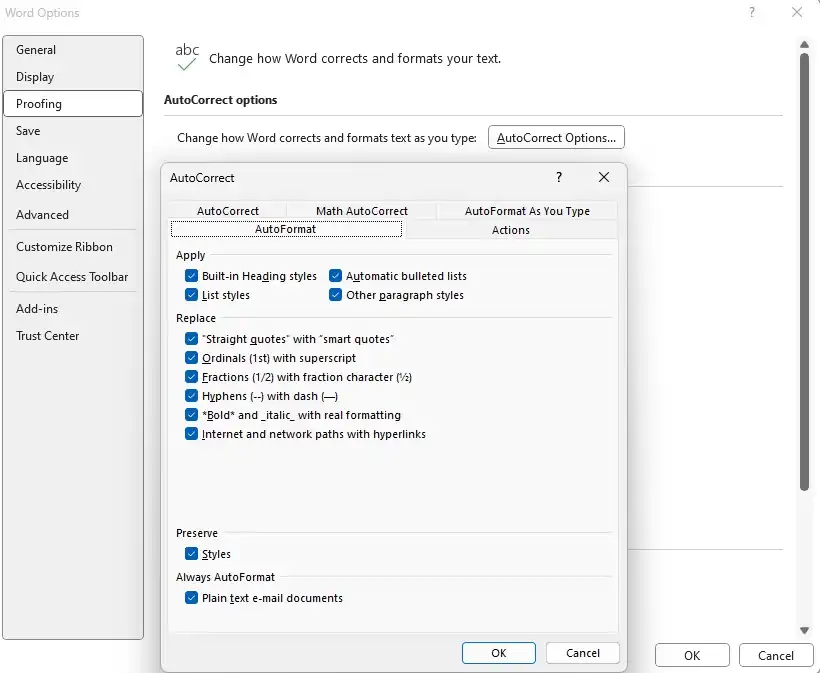
When you press return to create a new paragraph, the program will automatically modify a section that begins with a number to a numbered list. You may change this behavior in the options. Go to File > Options > Proofreading. Select the Autoformat tab from the Autocorrect settings menu. You’ll notice a lot of checkboxes for stuff you don’t want, such as automated bullet points.
Another irritant for many is Word’s insistence on highlighting entire words. For example, suppose you want to delete a sentence from the first letter halfway through the fourth word. In that case, it may appear impossible to get the highlighting right, so pressing the backspace key once will delete only that portion because as soon as you pass a space, Word begins highlighting one word at a time rather than one character.
Word Editing Options
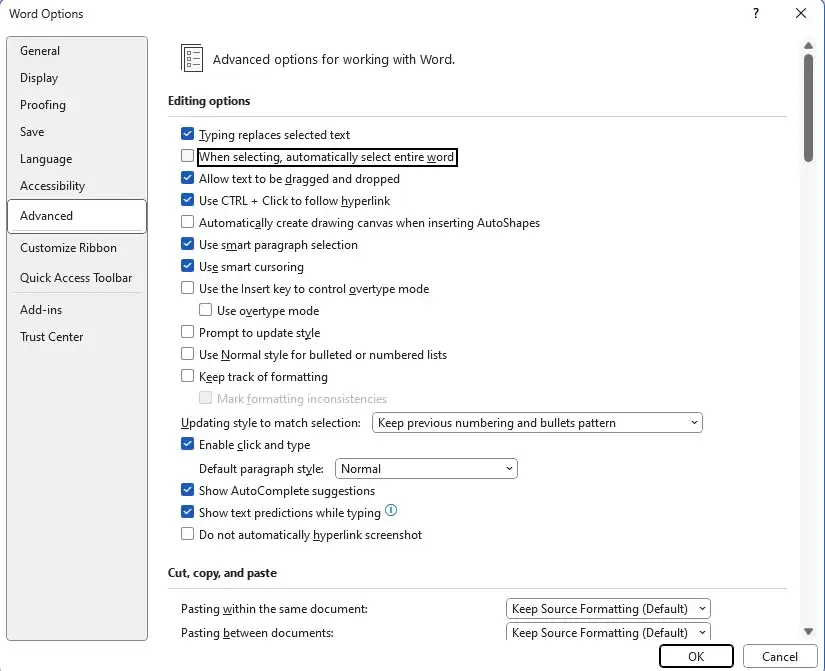
This may also be easily corrected by going to File > Options > Advanced and checking the box next to When selected, automatically choose a complete word. Word will highlight precisely what you desire. Suppose you don’t want Word automatically adding a new paragraph mark when you pick an entire paragraph. In that case, you can uncheck the Customize paragraph markup option and paste the paragraph into another paragraph.
Change the default stylesheets.
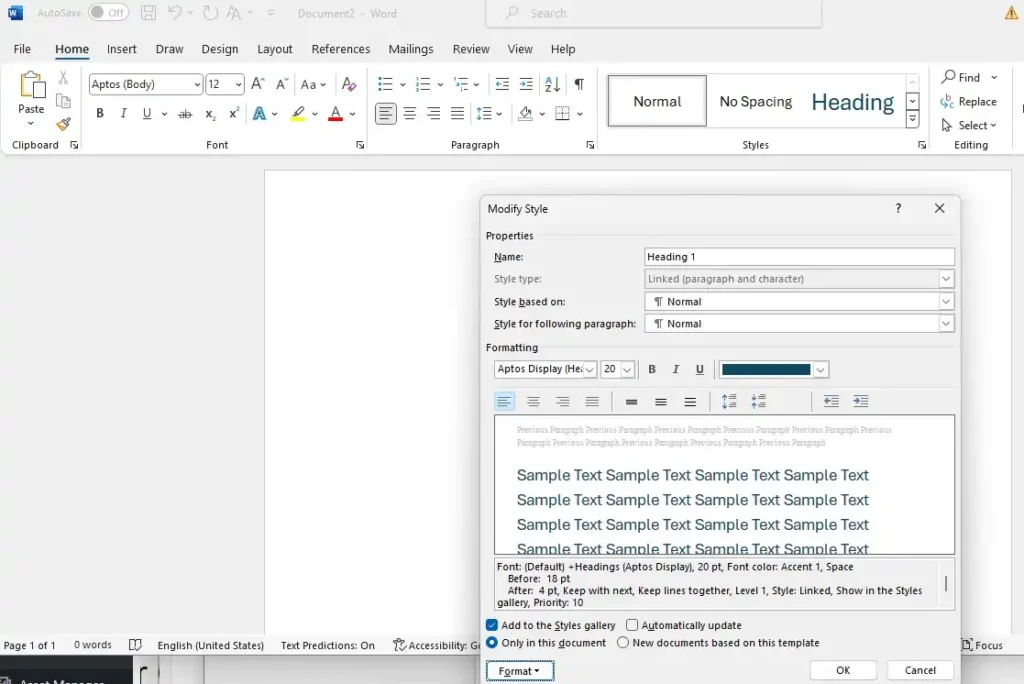
Have you ever wondered why Word comes with numerous stylesheets featuring blue text? Or how to change the default fonts in new documents? The good news is, these days, it’s surprisingly easy to customize Word to your liking.
Right-click a style, such as Heading 1, and select Modify. Make any adjustments, such as using black text or changing the typeface. When you’re satisfied, click New documents based on this template, then OK to save your modifications to the default template. If you modify the style sheet Normal, it will affect several other templates that rely on it: No spacing, subheading, quotation, strong quote, and list piece all use the same font as Normal.
Mastering the search function.
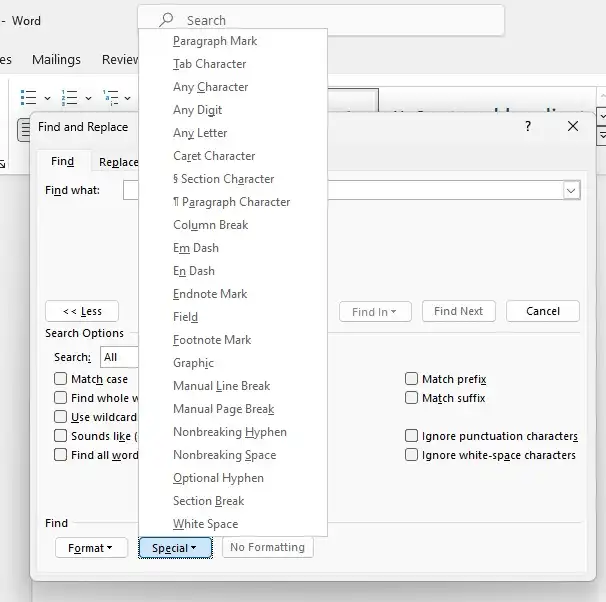
As you’re presumably aware, Word offers a search tool. You’re undoubtedly also familiar with the slightly more complex Find and Replace functionality. However, Word’s search engine is far more sophisticated, and you can look up stuff you have yet to consider.
Select Find to the right of the typefaces in the Home ribbon, followed by Advanced Find. The dialog box that appears has three tabs: Replace is the standard search and replace feature, and Go to provides a shortcut to a page number or bookmark, for example. However, on the Find tab, a More button displays various search settings.
Two drop-down menus provide more search options. The Format menu allows you to search for text with a specific font or italicized font. The Special menu locates special characters like line breaks and tricky spaces.
Transcribing recorded calls.
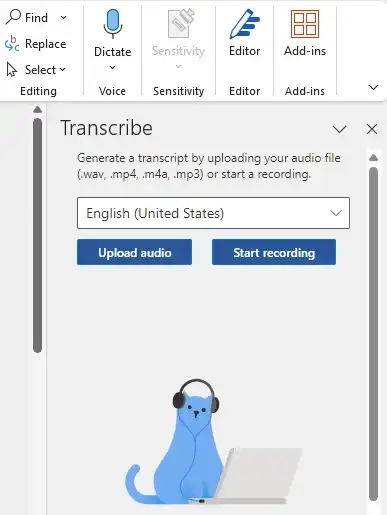
Do you have an audio recording you do not want on “paper”? Word now includes an AI-based transcription tool to make things easier. Click Dictate on the right side of the Start tab on the Ribbon and pick Transcribe; the feature will appear in the right column.
If English is not already preset, select it, and then click Upload audio to transmit a recording to the Microsoft server. The transcription may take a while; Word will notify you when it is complete. When it is, click Add to document, where you will see four options for formatting the text.
When I tested it, the results were full of errors. Therefore, it cannot be used directly in any text. However, it is compelling enough to grasp what the speakers have said based on context and can be documented clearly if necessary.
Word’s desktop version now has audio transcription capabilities. This function is still entirely free.
Share documents with others and co-edit.
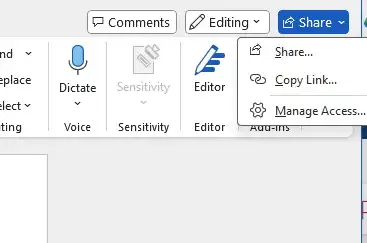
When Google started gaining ground in Office’s market, one of the reasons was the ease with which multiple collaborators could edit a document or spreadsheet simultaneously. Recognizing the value of collaborative editing, Microsoft introduced similar tools in 2013, making teamwork and document creation more efficient.
Today, inviting others to edit documents in Word, Excel, and PowerPoint is simple, and they may do so using either the desktop or web applications. To get started, make sure the document is saved to OneDrive. Then click the Share icon in the upper right corner. There are two possibilities here: invite and share with certain people or establish a link that anybody may use. The former is safer, but if you don’t know the email address the person you’re inviting uses for their Microsoft account, a link is more convenient.
If more than one user has a document open for editing, everyone can see where the others are working. This lowers the danger of editing conflicts that can occur when two individuals make changes in the same spot at the same time. If a quarrel arises, Word can assist in resolving it.
Read and repair old versions of documents.
Saving your papers on OneDrive has various advantages over keeping them locally. First, autosave is enabled, so you don’t have to sit and press Ctrl+S simultaneously. Sure, Word has a recovery option in case of a crash, but many users have horror stories of enormous documents that they forgot to save and then disappeared without a trace, never to be recovered.
Another advantage is that OneDrive stores version history, allowing you to revert to prior document versions without saving multiple versions. “Report_last_draft_final_final_final.docx” will no longer exist.
Here’s how you can find older versions:
1. Open the document from OneDrive.
2. In the Word window, click on the above file name.
3. Select Version History to see the current version and a list of previously saved versions on the right.
4. To view a prior version, click on it.
5. To restore the old version, click the Restore button in the yellow strip below the toolbar or select and copy text, which you can then paste into a new document or the latest saved version to restore only that section.
Draw
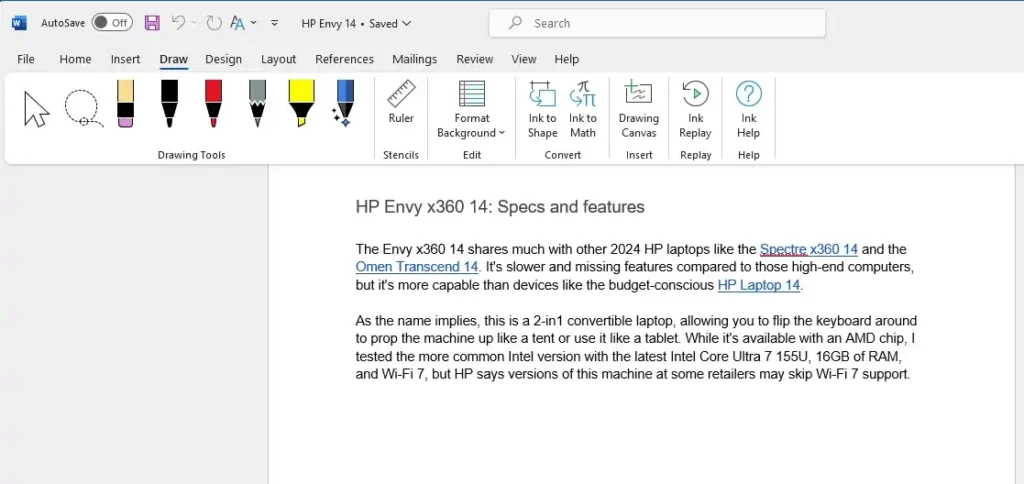
Word has always featured options for inserting images and shapes into documents, but did you know that it now includes sketching tools? Microsoft included them to make Word more accessible on PCs and tablets with touchscreens and/or pens, but they are equally compatible with a mouse or trackpad.
To view the different options, click on the Draw menu tab. On the left, there are various pens, erasers, and two types of markers. The next button is Ruler, which displays a virtual ruler over the paper, allowing you to create straight lines. To modify the ruler’s angle, hold the pointer above it and scroll the mouse scroll wheel (or drag with two fingers on the trackpad). To relocate it, click and drag.
Other capabilities could be more intriguing, except Ink to Math, which allows you to print formulas and equations with proper formatting easily.
AI writing aid with Microsoft Editor and Word Editor.
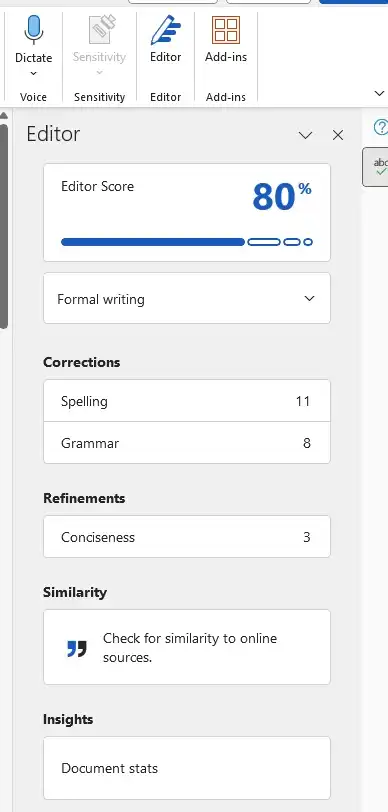
Microsoft Editor is a sophisticated, AI-based improvement to Word’s long-standing spell and grammar checker. It is pre-installed with Word and Outlook on Windows and Mac, but it is also available as an extension for Chromium-based browsers like Edge and Chrome.
In Word, the Editor is located beneath the button on the right side of the Start tab in the Ribbon. It opens in a column to the right of the window.
A percentage rating of the document appears at the top of the Editor. The proportion increases as you solve the problems discovered by the tool. Below the judgment, there are four sections: Corrections, which displays spelling and grammar errors; Refinements, in which the program suggests changes to make the language more formal and precise; Similarity, which compares your text to online sources; and Insights, a shortcut to the old Readability Statistics feature that displays figures such as the number of sentences per paragraph and the number of words per sentence.
Click on each subcategory to view the Editor’s recommendations. As with the previous spelling feature, you can alter, ignore, or add terms to the glossary and accept or reject any proposed modifications.
Related articles from your friends at Your Career Place. Thank you for visiting Your Career Place.
https://yourcareerplace.com/career-management-tip/lazyapply-job-application

